Skip to Main Content

Poster Printing: Creating A Poster

Poster sessions at conferences and professional meetings are a way to visually convey the details of your research or conclusions. This guide will offer you the basics in design, content and printing resources.

Poster Templates With Touro Logos

Click on one of the following Touro logos to download a 36"h x 48w" PowerPoint template.
You can then customize your poster using the instructions on this guide.

Creating A Poster In PowerPoint 2016

Launch PowerPoint and either choose a template or select Blank Presentation.

Specify the dimensions of the poster before adding content by clicking on the Design tab, then clicking on Slide Size, then Custom Slide Size.
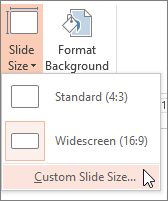
Image result for powerpoint custom slide size

In the Slide Size dialog box, enter the width and height for your poster.  There is no standard poster size.  The  most common size is 36"x48".  Always check the size requirements set by the event.  One of the sides must be 36" or smaller to print at the Sirota Memorial Library.  Widescreen is the default setting.  Choose landscape or portrait.

In the next dialog box, you can select Maximize to take full advantage of the space available, or you can select Ensure Fit to make sure that your content fits on the vertical page.

  • If you want to use a background color other than white, you can change it. Click on the Design tab, then click on the Format Background icon.  
  • To add text to your poster, click on the Insert tab and choose Text Box.   Then click and drag to create a text box.  You can change the box size and location later.
  • To add an image to your poster, click on the Insert  tab and click on either the Pictures, Online Pictures, Screenshot, or Photo Album icon depending on where your image is stored.

  • To add shapes or lines, click on the Insert tab and choose Shapes . A dropdown menu appears with many different shapes. Choose a shape, then click and drag to add it to your poster. 
  • To add a chart, choose the Insert tab and click on the Chart icon.  An Excel spreadsheet will open where you can enter your data. If you need to change something in your chart, you can right click on the Chart and go to Edit Data.  The benefit of creating a chart in PowerPoint is that the Excel spreadsheet is saved with your PowerPoint file.  You can change the data and the chart will resize automatically. 

You can add formatted equations by clicking on the Insert tab and choosing Equation.

FINALLY, save the file as either PowerPoint or pdf!

Additional tips:

  • Always insert a picture instead of using copy and paste. This will avoid problems when your poster is printed.  Exception: graphs and diagrams that are already in PowerPoint or Excel are safe to copy and paste.
  • "Ungroup" all graphs, charts, and formulae generated outside of PowerPoint after insertion to prevent printing errors and shifting.
  • All symbols must be "inserted".  After placing your cursor in a textbox, go to the Insert menu, then choose Symbol and select the symbol you want to place in your file. If the symbols are not placed in your file through the Insert menu, they may not print or may print as the wrong symbol.
  • PowerPoint’s page setup limits dimensions to 56”.  If your poster is larger, set the dimensions to half their final print size, then print the poster at 200% (A 36” by 72” poster would have a page size set to 18” by 36”).

  • Use the 'Align' and 'Distribute' functions in Powerpoint to make sure objects are aligned and distances between them are even.  Quick video on using Align/Distribute

Touro College of Osteopathic Medicine and College of Pharmacy
Harlem Campus 230 West 125th Street New York, NY 10027 (212) 851-1199